ML Pipeline
We will now introduce Spark.ML which provides us with the Pipeline feature.
ML Pipeline Basics
A pipeline in Spark is basically defined as:
object Pipelines {
  type PipelineNode[Input, Output] = (Input => Output)

  type Pipeline[Input, Output] = ((Input) => Output)
}
hat this is saying is that a “PipelineNode” has the same interface as a function from an input of type “Input” to output of type “Output”. That is - a pipeline node is just a function. To define a new node, you simply have to write a class that implements this interface.
For example:
case object Vectorizer
  extends PipelineNode[RDD[Image], RDD[Vector]]]
  with Serializable {
  override def apply(in: RDD[Image]): RDD[Vector] = {
    in.map(_.toVector)
  }
}
This node simply takes an RDD[Image] as input, and produces an RDD[Vector] as output. It does so by calling “_.toVector” on each element of its input.
Now imagine we have a second node which is called InterceptAdder and adds a 1 to the beginning of each vector.
I could just write:
//pipeline takes an RDD[Image] and returns an RDD[Vector] with 1 added to the front.
val pipeline = Vectorizer andThen InterceptAdder

//To apply it to a dataset, I could just write:
val x: RDD[Image] = sc.objectFile(someFileName)
val result = pipeline.apply(x) //Result is an RDD[Vector]
//or equivalently
val result = pipeline(x)
What is important here, is the keyword andThen. It connects the output of the Vectorizer to the Input of InterceptAdder.
However, this only works, because InterceptAdder expect Vectors as Input!
Note: Since the pipeline operations are really just transformations on RDD’s, they automatically get scheduled and executed efficiently by Spark.
CIFAR-10 Image Classification Example
In the following, we want to demonstrate the effectiveness of pipelines on a fundamental computer vision problem - Image Classification. We will run our examples on AWS using the ampcamp-pipelines scripts which uses the CIFAR-10 Dataset as example.
We’ll be using the “binary” dataset from the CIFAR webpage, which is formatted as follows:
<1 x label><3072 x pixel>
...
<1 x label><3072 x pixel>
Note : To run image classification training on AWS, we need to expand our akka.frameSize of our SparkContext!
spark-submit --conf spark.akka.frameSize=100
First simple image classification pipeline
Let's have a look at LinearPixels.scala
package pipelines

import nodes._
import org.apache.spark.{SparkContext, SparkConf}
import utils.Stats

object LinearPixels {
  def main(args: Array[String]) = {
    val trainFile = args(0)
    val testFile = args(1)
    val conf = new SparkConf().setAppName("LinearPixels")
    val sc = new SparkContext(conf)
    val numClasses = 10

    //Define a node to load up our data.
    val dataLoader = new CifarParser() andThen new CachingNode()

    //Our training data is the result of applying this node to our input filename.
    val trainData = dataLoader(sc, trainFile)

    //A featurizer maps input images into vectors. For this pipeline, we'll also convert the image to grayscale.
    val featurizer = ImageExtractor andThen GrayScaler andThen Vectorizer
    val labelExtractor = LabelExtractor andThen ClassLabelIndicatorsFromIntLabels(numClasses) andThen new CachingNode

    //Our training features are the featurizer applied to our training data.
    val trainFeatures = featurizer(trainData)
    val trainLabels = labelExtractor(trainData)

    //We estimate our model as by calling a linear solver on our
    val model = LinearMapper.train(trainFeatures, trainLabels)

    //The final prediction pipeline is the composition of our featurizer and our model.
    //Since we end up using the results of the prediction twice, we'll add a caching node.
    val predictionPipeline = featurizer andThen model andThen new CachingNode

    //Calculate training error.
    val trainError = Stats.classificationError(predictionPipeline(trainData), trainLabels)

    //Do testing.
    val testData = dataLoader(sc, testFile)
    val testLabels = labelExtractor(testData)

    val testError = Stats.classificationError(predictionPipeline(testData), testLabels)

    EvaluateCifarPipeline.evaluatePipeline(testData, predictionPipeline, "linear_pixels")
    println(s"Training error is: $trainError, Test error is: $testError")

  }

}
This pipeline uses six nodes - a data loader, a label extractor, an image extractor, a grayscale converter, a node to take the image pixels and flatten them out into a vector for input to our linear solver, and a linear solver to train a model on these pixels.
When running we get:
Training error is: 66.998, Test error is: 74.33
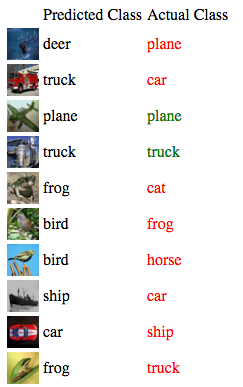
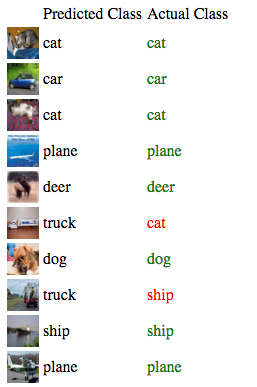
We can also have a look at the results at port 18080
python -m SimpleHTTPServer 18080
It is not really good, however, this was only the first try and we can do better. ML Pipelines allows us to easily extend our pipeline.
Improved Featurizer
Let's extend our simple featurizer:
val featurizer =
  ImageExtractor
    .andThen(new Convolver(sc, filterArray, imageSize, imageSize, numChannels, None, true))
    .andThen(SymmetricRectifier(alpha=alpha))
    .andThen(new Pooler(poolStride, poolSize, identity, _.sum))
    .andThen(new ImageVectorizer)
    .andThen(new CachingNode)
    .andThen(new FeatureNormalize)
    .andThen(new InterceptAdder)
    .andThen(new CachingNode)
which gives us a much better test error:
Training error is: 36.235596, Test error is: 42.88
Nice, this shows us how important feature extraction is in machine learning. Playing around with the scripts we can even get a lower testscore.


Loading Pre-Trained Pipelines
Due to the computational requirements required to featurize the training data and train the model on your machine in the time allotted. ML Pipeline allows us to load and ship pipelines.
import utils.PipelinePersistence._

//Save the pipeline.
savePipeline(predictionPipeline, "saved_pipelines/your_pipeline.pipe")

//Load the pipeline from disk.
val predictionPipeline = loadPipeline[RDD[Image],RDD[Array[DataType]]]("saved_pipelines/your_pipeline.pipe")

//Apply the prediction pipeline to new data.
val data: RDD[Image]
val predictions = predictionPipeline(data)